How to Close Down a Swimming Pool for Winter: A Comprehensive Guide
Protecting your pool for the winter is like ensuring a hibernating bear is well-fed and safe in its den. Both awaken in spring, either ready for action or facing issues from neglect. Here’s an in-depth guide on how to close down a swimming pool for winter.
The winter poses a number of challenges for swimming pools, including:
- Low / freezing temperatures
- High rainfall
- Damaging high winds and leaf fall.
1. Preparation Steps to Close Down a Swimming Pool
Overview
A robust winterising process pivots on the foundation of well-structured preparation. It’s about ensuring that the process becomes seamless by equipping yourself with everything you’ll need well in advance.
Tools & Supplies Inventory
A thorough inventory check is pivotal. Write down every tool and supply you think you’ll need. This includes pool chemicals, cover weights or water bags, pool plugs, air compressors, and any specialised equipment that pertains to your specific pool type.
If you’ve winterised your pool in the past, review your old list and note down anything you ran out of or wished you had.
Equipment Manuals
There’s no underestimating the value of your equipment manuals. Each piece of equipment, whether it’s your pool’s pump, heater, or filtration system, has specific winterising procedures.
Missteps can lead to costly damages. It’s essential to keep these manuals organised and within arm’s reach during the winterising process.
Safety First
The chemicals used to treat pools can be caustic and harmful if mishandled. This isn’t just about wearing gloves but ensuring you’re working in a well-ventilated area.
Keep a first-aid kit nearby, make sure to keep chemicals out of reach of children, and always follow the manufacturer’s instructions to the letter.
Ordering Supplies
If you find that you’re running low on specific chemicals or tools, don’t wait until the last minute. Pool supplies can become scarce as many people close their pools around the same time. Order early to avoid the rush.
Additional Tip
Before diving into the winterising process, it might be helpful to sketch a rough outline or timeline of the steps you plan to take. Not only does this give you a roadmap, but it also provides a sense of accomplishment as you tick off each step.
Remember, preparation now can save hours of potential troubleshooting later.
2. Deep Cleaning
Overview
Deep cleaning isn’t just about aesthetics. A clean pool prevents imbalances and issues that can escalate during the winter months. Thorough cleaning ensures that come spring, your pool is not only easy to open but also remains in pristine condition.
Skimming
Regular skimming is a must. Floating debris such as leaves, insects, and twigs can slowly sink, making them harder to remove later. Using a long-handled leaf skimmer, make it a habit to regularly collect debris, especially after windy days or storms. This prevents potential staining and reduces the workload for the next phase.
Vacuuming
Once the floating debris is managed, focus shifts to the pool’s floor. Here, the settled dirt, from sand to small pebbles, needs addressing. Using an automatic or manual pool vacuum, ensure that every nook and cranny is attended to. Pay special attention to areas with low water circulation as these are hotspots for sediment accumulation.
Brushing
It’s an essential step many overlook. Pool walls, especially in the corners, are prone to algae buildup. Algae can be stubborn, and if not adequately addressed, can bloom during the off-season.
Using a stiff-bristled pool brush, scrub down every inch of the pool’s surface.
Don’t forget areas around steps, ladders, and other fixtures.
Filter Maintenance
The filter is your pool’s primary defence against contaminants. Over the season, it collects vast amounts of dirt and debris. Clean, backwash, or replace cartridges/filters as necessary, following the manufacturer’s guidelines.
Additional Tip
For a thorough cleaning session, consider dividing your pool into sections. Tackle one section at a time, ensuring each gets the attention it deserves. This systematic approach guarantees that no area is missed and makes the task less daunting.
Remember, a pristine pool now means fewer complications later.
Ensure the water is clear (the bottom of the swimming pool at it’s deepest point can clearly be seen) and free from debris before proceeding to the next step.
3. Lowering the Water Level
Overview
The task of adjusting your pool’s water level for winter is pivotal. Water expands when frozen, and this expansion can be detrimental to the pool’s structure, plumbing, and equipment.
Achieving the right water level is a balancing act — it’s about safeguarding the pool while ensuring it remains covered and protected.
Determining the Right Level
Before you start, it’s essential to decide the correct water level for your pool type.
For vinyl liner pools, typically, you would lower the water about one inch below the skimmer.
For concrete or plaster pools, the level might be slightly lower.
Always consult the pool’s manufacturer guidelines or speak to a pool professional if unsure.
Draining Procedure
Using a submersible pump is the most efficient way to lower water levels. Ensure that you’re draining water at a pace that doesn’t stress the pool’s structure. Also, be aware of where the water is being discharged, ensuring it doesn’t affect the surrounding landscape or violate local drainage regulations.
Protection for Skimmers and Returns
Once the water level is down, there’s a risk of equipment damage due to freezing water.
For skimmers, consider using a device called a ‘Gizzmo,’ which absorbs the expansion of freezing water and protects the skimmer from cracking. Alternatively, adding antifreeze specifically designed for pools can also help prevent freezing damage.
Water Conservation
While lowering the pool’s water level is necessary, consider where this water can be repurposed. Whether you’re watering plants, trees, or even cleaning the exterior of your house, think of ways to use this water efficiently.
Additional Tip
If you reside in an area with unpredictable fall weather, monitor the forecasts closely.
Rain can quickly change the water level, undoing your efforts. Likewise, if your pool is surrounded by trees, try to coordinate the water lowering after most of the leaves have fallen to avoid additional cleanup.
4. Treating the Water with Chemicals
Overview
Treating the water with chemicals before winter sets in is akin to giving your pool a protective shield. This shield wards off contaminants, bacteria, and algae, ensuring that your pool water remains clear and clean throughout the colder months.
Moreover, proper chemical treatment can save you significant time and money when reopening your pool in the spring.
The ideal water readings of your swimming pool should be:
- pH 7.0 – 7.4
- Free Chlorine Normal Operating 1.0 – 2.5ppm.
Shock Dosing 5.0 – 10ppm - Cyanuric Acid (Chlorine Stabiliser) Ideal 25ppm. Upper limit 50ppm
- Total Alkalinity (TA) 80 – 150ppm
- Calcium Hardness Minimum 250ppm
- Calcium Hardness Minimum 200ppm
- PPM = Parts per Million
Importance of Winterising Chemical Kits
These kits are specifically designed for the winterising process. They often contain a combination of algaecide, shock treatment, and mineral content balancers.
Investing in a good winterising kit ensures that your pool is armed against the most common off-season threats.
Chlorine Stabiliser (Cyanuric Acid)
Firstly, check the chlorine stabiliser (cyanotic acid) reading, if this is too high you may need to dilute the water to achieve the correct reading. Ideally a reading of no higher than 50ppm (parts per million) however a lower reading of 25ppm is ideal.
If the cyanuric acid reading is too high this will significantly reduce the efficiency of the free chlorine. We will be running a number of additional posts about the impact of cyanotic acid (chlorine stabiliser) in future posts.
Balancing the Water
Before introducing winterising chemicals, it’s important to ensure that the pool’s pH, alkalinity, and calcium hardness levels are balanced. A pH of around 7.0 to 7.4 is ideal.
Balanced water not only protects the pool surface and equipment but also ensures that the winterising chemicals work effectively.
Chlorine Levels Advice
While you might think adding a large dose of chlorine (or shocking the pool) is ideal before closing, be cautious. High chlorine levels can damage pool liners over prolonged periods.
After shocking, it’s advisable to wait until the chlorine level drops to a more moderate range before covering the pool for winter.
Shock Dosing
Add a chlorine shock dose the water with an unstabilised chlorine; use either sodium hypochlorite (liquid chlorine) or calcium hypochlorite granules (Chlorine Shock Granules).
Dose at a minimum rate of 5 – 10ppm although refer to any manufacture instructions especially for liner pool finishes.
Typically when using granular calcium hypochlorite a dose rate of around 700g – 750g for a 45,000lt swimming pool will raise free chlorine reading to between 5 – 10 ppm.
After a minimum of 24 hours backwash the filter.
Next adjust the pH to 7.6 7.8 (this pH value ensure the flocculant works best) set the water to recirculate and then add a good quality flocculant that doses at a rate of 1lt per 50,000lt. Allow this solution to circulate for 2 – 4 hours and then allow the water for to settle for at least 6 hours and then vacuum the swimming pool too waste.
Now add a water clarifier, a concentrated liquid product is ideal which will dose at a rate of 500ml per 50,000lt of swimming pool water is ideal
Algaecides
Algae growth can be rampant in stagnant water. A quality winter algaecide will create a lasting barrier against algae, preventing blooms that can be a headache come spring.
Whilst the water is circulating add a good quality Winteriser Algaecide evenly around the surface of the swimming pool water.
There are many winterising algaecides available, our advice is to invest in a very good quality product with a concentrated dose rate such as 1 – 3 litres of algaecide treating 50,000 litres of water.
Final pH Check
Test the pH of the water and adjust to 7.4 – 7.5 for the final winterisation process.
IMPORTANT: ALLOW WINTERISING SOLUTION TO CIRCULATE FOR 24 HOURS BEFORE DECOMMISSIONING THE PLANT ROOM EQUIPMENT.
Additional Tip
When adding chemicals, always ensure good water circulation to distribute them evenly. Allow the pump to run for several hours after introducing chemicals. And remember, safety first: always read labels, never mix chemicals, and store them out of reach of children and pets. Proper chemical treatment is not just about adding substances but understanding the synergy between them for optimal pool health.

5. Performing a Water Health Check
Overview
A water health check is like a routine medical check-up but for your pool. It’s an analysis to ensure that the water’s chemistry is balanced and free from harmful contaminants.
By closely monitoring and adjusting the water’s properties, you ensure its longevity, the safety of swimmers, and the protection of pool equipment.
Frequency of Checks
Even during the off-season, periodic water health checks are essential. Temperature fluctuations, rainfall, and other environmental factors can affect water chemistry.
Aim for at least monthly checks to ensure consistency.
Key Parameters to Monitor
- pH Level – This indicates the water’s acidity or alkalinity. An ideal range is between 7.5 during Winter. Too high or too low pH can lead to issues like calcium scaling or corrosion of metal parts.
- Total Alkalinity (TA) – Acts as a pH buffer, preventing rapid pH swings. The recommended range is 80 to 150 ppm for most pools. If the TA becomes too high along with a high pH (7.8 and above) scale can occur.
- Calcium Hardness – This is a measure of the water’s calcium content. Soft water (low calcium) can corrode metal fixtures, while hard water (high calcium) can cause scaling. Aim for 250 to 400 ppm.
- Sanitiser Levels – Whether you use chlorine, bromine, or another sanitiser, maintaining appropriate levels ensures the water remains free of harmful pathogens.
There are a number of additional health checks you can undertake on the swimming pool water these include, investigating and undertaking. Some of these can be undertaken by you and we will be posting a number of new posts detailing the following subject in greater depth.
For the more in-depth health checks consider speaking to your local swimming pool professional or subscribe to our personal support service.
Additional areas to monitor include:
- Phosphates
- Dissolved Metals
- Balanced water
- Combined Chlorine
There will be a series of upcoming posts and videos to support our Water Health Check advice.
Utilising Test Kits
These are the primary tools for water checks. While test strips offer quick readings, Photometer or comparator test kits utilising tablet reagents are more accurate. Choose based on your comfort and accuracy requirements.
Seek Professional Help
If you’re unsure about the results or if the water’s parameters are consistently off, consider seeking help from a pool professional. They can provide insights, offer solutions, and ensure that your pool remains in optimal condition.
Additional Tip
Keep a logbook of your water test results. This historical data can be invaluable in understanding patterns, predicting potential issues, and making informed decisions about treatments and adjustments.
Always store your testing kits and chemicals in a cool, dry place, away from direct sunlight, for longevity and accuracy.
6. Decommissioning Plant Room Equipment
Overview
The plant room houses vital components such as pumps, heaters, and filtration systems.
Decommissioning these during winter isn’t merely about turning them off; it’s a methodical process to ensure they’re protected from cold temperatures and ready for efficient operation in the next season.
Pump Care
The heart of your pool’s circulation system needs special attention.
Before shutting it down, ensure it’s free of debris. Remove the drain plugs to let out any remaining water, as trapped water can freeze and damage the pump.
Store the plugs in a labelled bag, so they’re easy to locate in spring.
Filter Maintenance
Depending on your filter type (sand, glass, cartridge, or diatomaceous earth), the decommissioning process varies. In general, backwash and clean the filter thoroughly.
Remove any drain plugs and let the water out. For cartridge filters, the cartridges should be removed, cleaned, and stored indoors.
Heater Preparations
If you have a pool heater, ensure it’s free of residual water. Disconnect it from the power source and remove drain plugs to prevent freeze damage.
Protecting the heater with a cover can also help extend its lifespan.
Chemical Feeders
Empty and clean chemical feeders, such as chlorinators. Leaving chemicals inside can damage the equipment. Once cleaned, open them to ensure ventilation.
Additional Equipment
For other devices like salt chlorine generators, UV Disinfection systems or pool automation systems, consult the manufacturer’s guide. Most often, it involves cleaning, ensuring no water remains trapped, and safely storing any removable parts.
Additional Tip
Labelling is your ally. When disconnecting or removing any parts, label them and store them systematically. It not only ensures that no parts are lost but also makes the re-commissioning process in spring more efficient.
Additionally, consider using a checklist to track each step of the decommissioning process, ensuring nothing gets overlooked.
Lastly, if your plant room or equipment pad isn’t insulated, using protective covers or blankets can provide an added layer of protection against freezing temperatures.
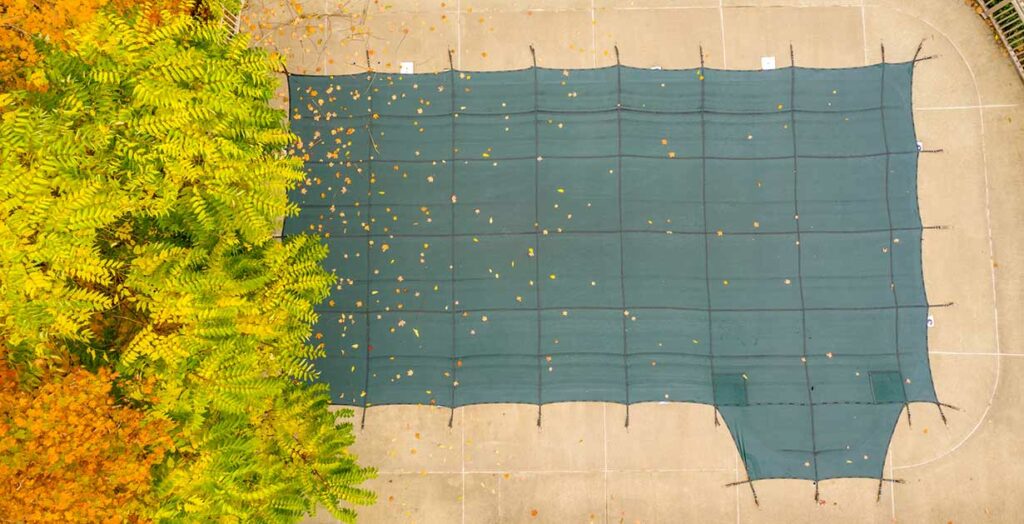
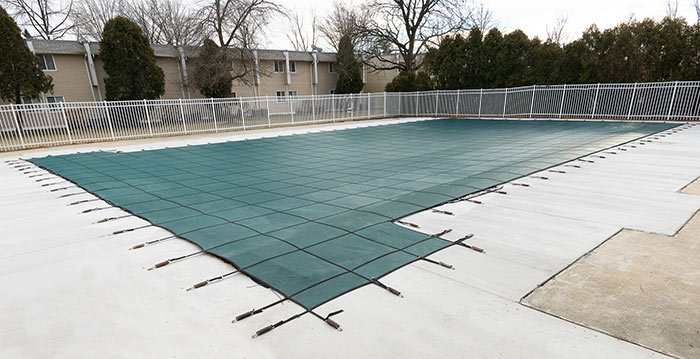
7. Swimming Pool Covers and Installing a Winter Debris Cover
Overview
A swimming pool cover isn’t just a barrier; it’s a protective layer that shields the pool from debris, unregulated rainfall, and freezing conditions. Especially in winter, having the right cover, installed correctly, can make all the difference in ensuring your pool remains in top condition.
Types of Covers
- Safety Covers: These are anchored to the pool deck and are made to withstand the weight of snow, ice, or even an adult. They’re typically made of mesh or solid materials, with some allowing water to filter through while keeping debris out.
- Winter Covers: Specifically designed for winter, these covers float on the water and are held in place with water bags or weights. They’re primarily used to keep out debris.
Installing a Winter Debris Cover
- Clean First: Before installation, ensure both the pool and the cover itself are clean. Any debris left can stain the pool or degrade the cover.
- Positioning: Unroll the cover across the pool. If it’s a safety cover, line up the anchors or fastening points. For winter covers, ensure the cover drapes evenly across the pool.
- Securing the Cover: For safety covers, use the provided tools to secure it to the deck. For winter covers, place water bags or weights around the perimeter, ensuring no gaps are present. Avoid using bricks or sharp objects, as they can damage the cover or pool liner.
- Water Bags: When using water bags, only fill them halfway. This prevents them from breaking when they freeze and expand.
Additional Tips
Regularly inspect your pool cover for signs of wear or damage. Small rips or holes can expand under the weight of snow or ice. Having a cover repair kit on hand can be a lifesaver.
Also, after a heavy snowfall or rainfall, remove excess weight from the cover to prevent it from stretching or tearing.
If you’re using a mesh safety cover, remember that while it keeps debris out, finer particles and water will pass through; so periodic cleaning might still be needed.
8. Periodic Checks Throughout the Winter
Overview
Even when your pool is securely closed for the winter season, your responsibility doesn’t end.
Regular check-ups are paramount to ensure that the pool and its equipment stay protected and identify any potential issues before they become substantial problems.
Inspecting the Cover
This is your pool’s first line of defence during the winter.
Check for water or snow accumulation that can stretch and damage the cover. Use a pool cover pump to remove the water or gently push the snow off the cover using a soft broom.
Be careful not to puncture or tear the cover. Tighten any securing strap which may have become loose during high winds.
Monitor Water Levels
If you notice a significant drop in water levels beneath the cover, it might indicate a potential leak. Early detection can prevent substantial damage and costly repairs.
Conversely, if you see water levels rising too much due to rainfall or snow-melt, you might need to drain excess water to prevent the cover from floating.
Check the Equipment
While most of the pool equipment is decommissioned for the winter, it’s still wise to periodically inspect them.
Ensure there’s no water accumulation around or inside the equipment, as this can lead to freezing damage.
Clearing Surrounding Area
The area around your pool, like the deck and nearby landscaping, should also be kept clean.
Falling branches, leaves, or other debris can damage the pool cover or lead to unwanted buildup come springtime.
Watch for Freeze and Thaw
Be vigilant during freeze and thaw cycles. Ice can exert immense pressure on pool walls, leading to potential structural damage.
If you notice significant ice formation, avoid breaking it manually as this can harm the pool’s interior.
Top up Winteriser Algaecide
Consider topping up the Winteriser Algaecide if there has been excess rainfall through winter.
Check the Weather Forecast
If Spring is forecast to arrive early and we are likely to experience warm weather in the early months of the season consider opening the swimming pool to avoid the water becoming infested with algae bloom (the water goes green!)
Additional Tip
Keep a winter pool maintenance diary. By jotting down each check-up’s observations and actions, you create a valuable record that can guide maintenance decisions both in the current season and in the years to come.
These periodic checks might seem minor, but their cumulative effect ensures that your pool remains in optimal condition, ready for a smooth reopening when warmer days return.
9. Checking for Repairs and Necessary Maintenance
Overview
Winter’s grasp on your swimming pool can be rigorous, making it more susceptible to wear and potential damage.
Regular checks for necessary repairs and maintenance, even in the dormant season, can prevent minor issues from evolving into major problems, ensuring a hassle-free pool opening when summer returns.
Liner and Surface Inspection
For pools with liners, it’s essential to check for signs of wear, stretching, or potential leaks. Look for wrinkles, slippage, or fading. For concrete or tiled pools, be on the lookout for cracks or flaking. Early detection means easier repairs.
Equipment Checks
Even if your pool equipment is decommissioned, it’s still subjected to the environment’s wear and tear. Regularly inspect pumps, heaters, and filters for signs of rust, wear, or potential freeze damage. Any identified issues should be addressed before re-commissioning in the spring.
Filters and Filter Media
The filter media should be periodically checked, the winter close down season offers the perfect opportunity.
Sand media should changed every 5 years, consider replacement with glass media which offers better water clarity and is more sustainable solution.
Sealant
Expansion and contraction due to temperature fluctuations can compromise the sealants or caulking around your pool, especially at the junctions between the pool and the deck.
Check for signs of cracking or deterioration and make plans for re-sealing if needed.
Deck and Surroundings
The area around your pool also demands attention. Check for cracked tiles, damaged wood, or compromised concrete.
Ensure that drainage systems are free of blockages, and any fixtures like lighting or ladders remain secure.
Skimmer and Return Lines
Though they’re often out of sight, these components are crucial for your pool’s functionality.
Check skimmer baskets for damage and ensure return lines are clear and free of obstructions.
Additional Tip
Consider a professional inspection, especially if your pool is aging or has had prior issues. A pool specialist can provide a comprehensive assessment, identifying underlying problems that might not be visible to the untrained eye.
Remember, addressing repairs and maintenance during the off-season often means a smoother, quicker, and more cost-effective pool opening once warm weather beckons.
10. Critical Information When Using Chemicals
- Always follow user instructions printed on chemical labelling
- Never eat, drink, smoke or vape when using chemicals
- Avoid dosing chemicals during high winds or when raining.
- If pre-dissolving chemicals always use a clean container and wash out after use.
- Always keep chemicals out of the reach of children and pets
- Always replace the lids on chemical containers after use.
- Where PPE (Personal Protective Equipment) as instructed on labelling / packaging
- Always wash your hands after handling chemicals
- Store chemicals in a secure, clean, cool and dry place.
- Never mix chemicals. If in doubt contact our support section for further advice.
Final Thoughts
By dedicating time and effort to your pool’s winterisation process, you’re ensuring its longevity and optimal performance for many seasons to come.
Think of it as pampering a cherished asset.
Come spring, your pool will be ready for those joyous swims and sunny days, all thanks to your meticulous winter care.